Step 2: Cleaning
This step is optional, but I always do it to get the best possible quality from my HDRIs.
All we need to do is remove some of the lens artifacts in the photos, such as chromatic aberration, noise and vignetting. There’s a two-fold reason for doing this:
- Removing imperfections means prettier HDRIs
- It makes stitching easier – chromatic aberration and noise can sometimes confuse the stitching software
I recommend you use Lightroom for this, because it allows you to export 16-bit TIFFs that retain the EXIF data (a record of all the camera settings), which is absolutely required for stitching. There may be some other free software that can do this, but I don’t know of any. If there is no EXIF data, you’ll have to enter the exact shutter speed for each of your 135 images, which would be a real pain in the ass.
If you don’t have Lightroom, you can safely skip this step.
So once you’ve finished shooting, plug in your memory card or camera, fire up lightroom and import all the images.
Pick one of the well-exposed images (just so you can see what you’re doing, and head on over to the develop tab.
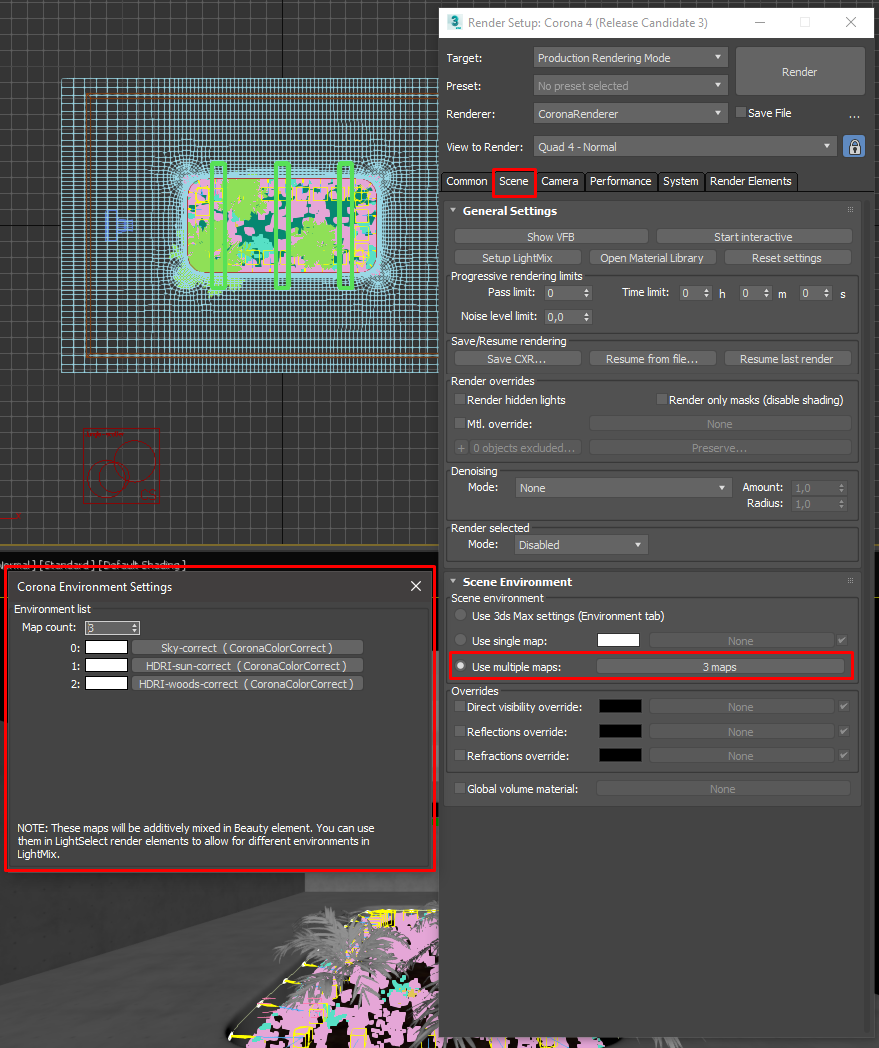
![]()
If you want to adjust the white balance at all, now is the time to do it. This image is a little too warm, so I’ll adjust it slightly.
![]()
It’s important not to do anything too drastic here, like adjusting contrast or exposure to make it look pretty. Our number one priority is to maintain realism, all we want to do is fix things that are artifacts, like chromatic aberration.
So if you zoom into one of the corners, you’ll probably see some subtle purple/green or red/blue colour fringes:
![]()
This is easily fixed, just turning on the “Enable Profile Corrections” and “Remove Chromatic Aberration” in the lens corrections panel usually does a pretty good job:
![]()
You may need to look at the Profile tab and select your exact camera and lens combo if it’s not detected automatically.
Then all we have to do is copy these settings across to the rest of the images, so select them all at the bottom (Ctrl-A) and click the “Sync” button at the bottom right.
![]()
A window will pop up with all sorts of checkboxes. Just click the “Check All” button at the bottom left of that window, and then hit “Synchronize”. This will update all the selected images with the lens corrections and white balance adjustment.


Finally, hit Ctrl-Shift-E to export the images (also accessible from the file menu). You can put them wherever you like, but the most important thing is to set the output format to 16 bit TIFFs:
![]()
Step 3: Stitching
Now the fun part!
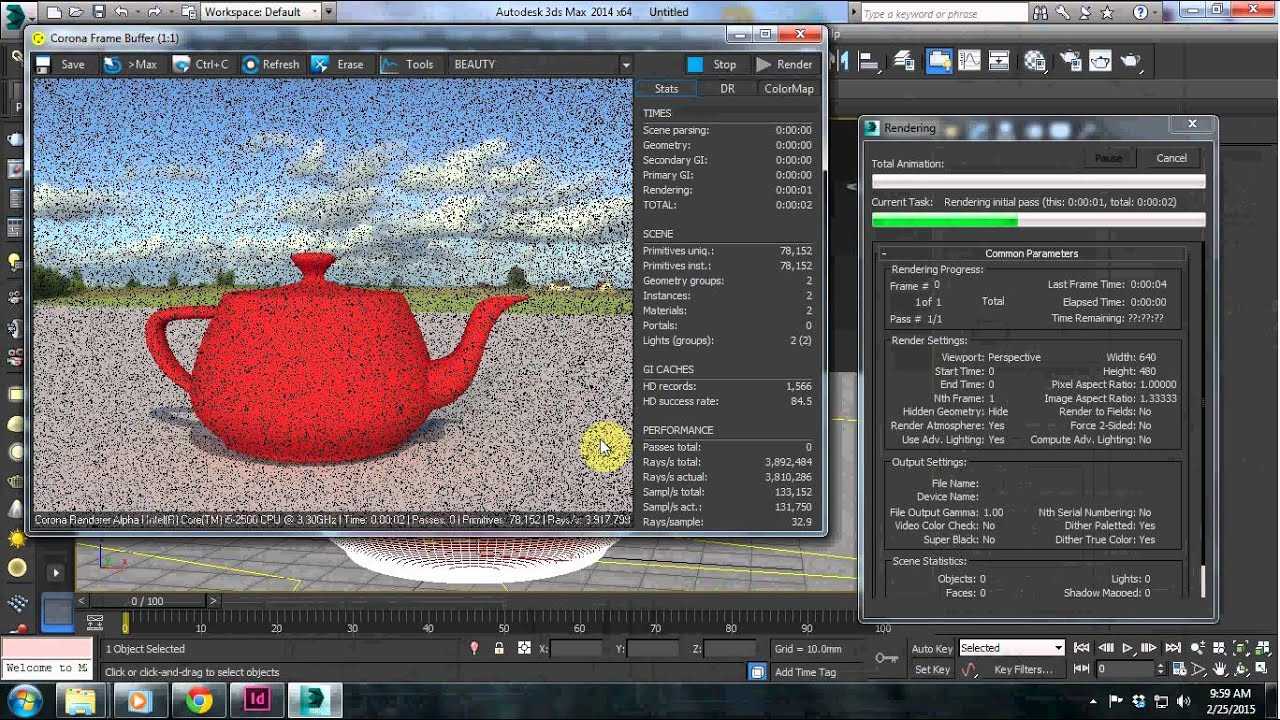
When you fire up PTGui you’ll see a simple screen like this:
![]()
The first thing to do is to bring in all our images. So hit the “Load images…” button, select all the files that your exported from Lightroom (or if you did not use Lightroom, just use the files you copied from your camera).
You’ll then see a long list of thumbnails. You may need to wait a little bit for these to finish loading before you continue.
![]()
The first thing we need to do is tell PTGui that this is an HDR panorama and link all the exposure brackets together so that it’ll understand that every 5 images is actually one photo (just with different exposures).
To do this, just go to Images > Link HDR Bracketed Exposures.
![]()
A confirmation dialog should pop up and tell you how many sets of how many brackets there are (in my case, 28 sets of 5 brackets). Just hit OK.
Now before we align the images, it’s a good idea to do some masking. We basically want to tell PTGui not to use certain portions of certain images that might confuse it.
An example of such an area would be the tripod that is visible at the bottom of some of the images – since some of the tripod (or pano head) is rotating with the camera, PTGui might get confused if it matches that area in each image.
Another thing we want to mask out is lens flares – when you add a mask in one image, PTGui will replace that portion of the panorama with content from a different photo, which will magically remove the lens flare.
So head on over to the Mask tab and slowly go through each image, and paint over anything you don’t want to see, like lens flares, the tripod, your own shadow, etc using the red mask. You’ll notice that since our exposure brackets are linked, you don’t have to paint on every photo, just one from each bracketed set. Since your tripod mask will look identical on every image, it’s a good idea to paint it once and then use the Copy/Paste buttons at the bottom left to speed things up. You can hold Shift to draw straight lines, or Ctrl to fill in an enclosed space.
![]()
When you’re done with that, go back to the Project Assistant tab and click Align images.
Another window will pop up asking about bracketed exposures. Make sure you choose the first option (linking the images again), and also choose “True HDR” at the bottom since we don’t want to tonemap the image.
![]()
PTGui will now go through all the images and try to find similar points between each of them (called “control points”). Usually it’s pretty good at this, but sometimes it will struggle a bit and may ask you to add control points manually (which is a time consuming process).
Lucky for me, it did a pretty good job on the first try!
![]()
If the Panorama Editor window isn’t already open, you can open it by hitting Ctrl-E. This window shows you (roughly) what the final panorama will look like, and lets you drag it around with the left and right mouse buttons to adjust the rotation.
If everything looks too dark or too bright, adjust the Exposure slider in the Exposure/HDR tab.
![]()
Just before we click the magic button, lets save our project in case anything goes wrong. As you can expect, you can just hit Ctrl-S or use the file menu.
And that’s it!
All that’s left is to choose what resolution we want in the Create Panorama tab (click “Set optimum size” to use the highest resolution possible), disable the JPG output option and finally click “Create Panorama”!
![]()
Depending on how powerful your computer is and what resolution you chose, this might take anywhere between a few seconds and several hours.
Once it’s done, there should be a .hdr file in the location that you saved the project!
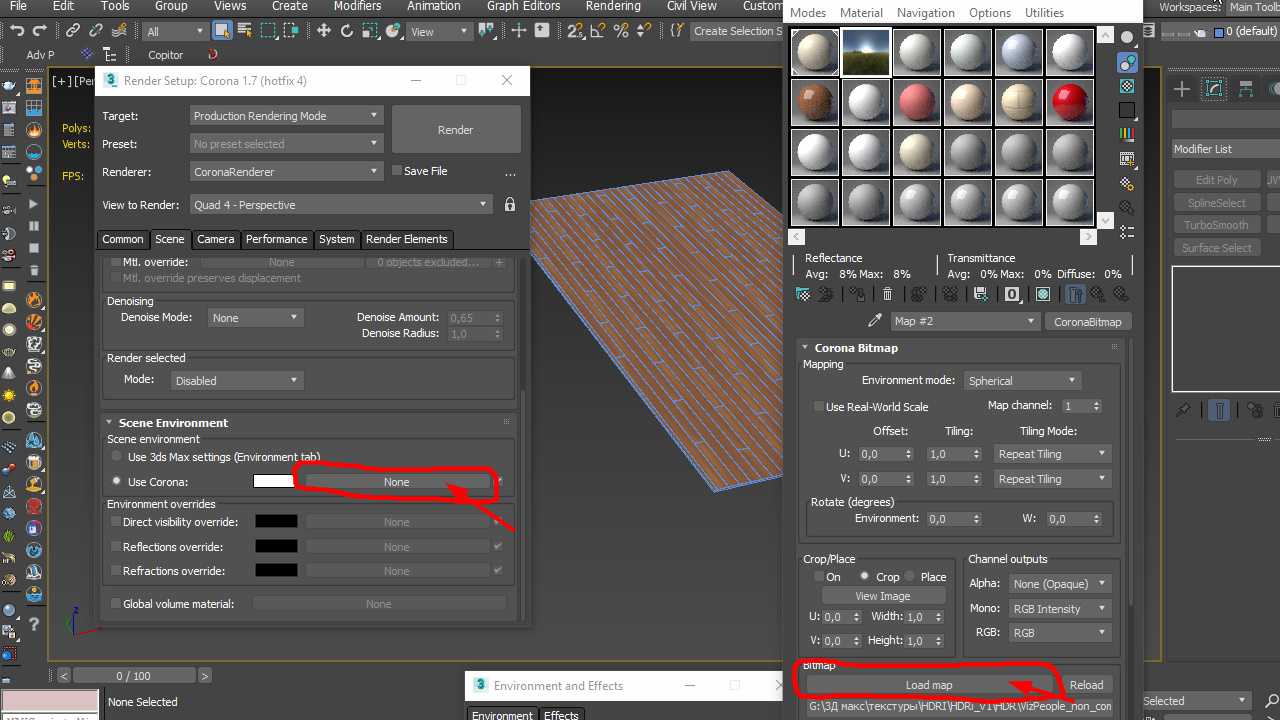
Чёткость теней
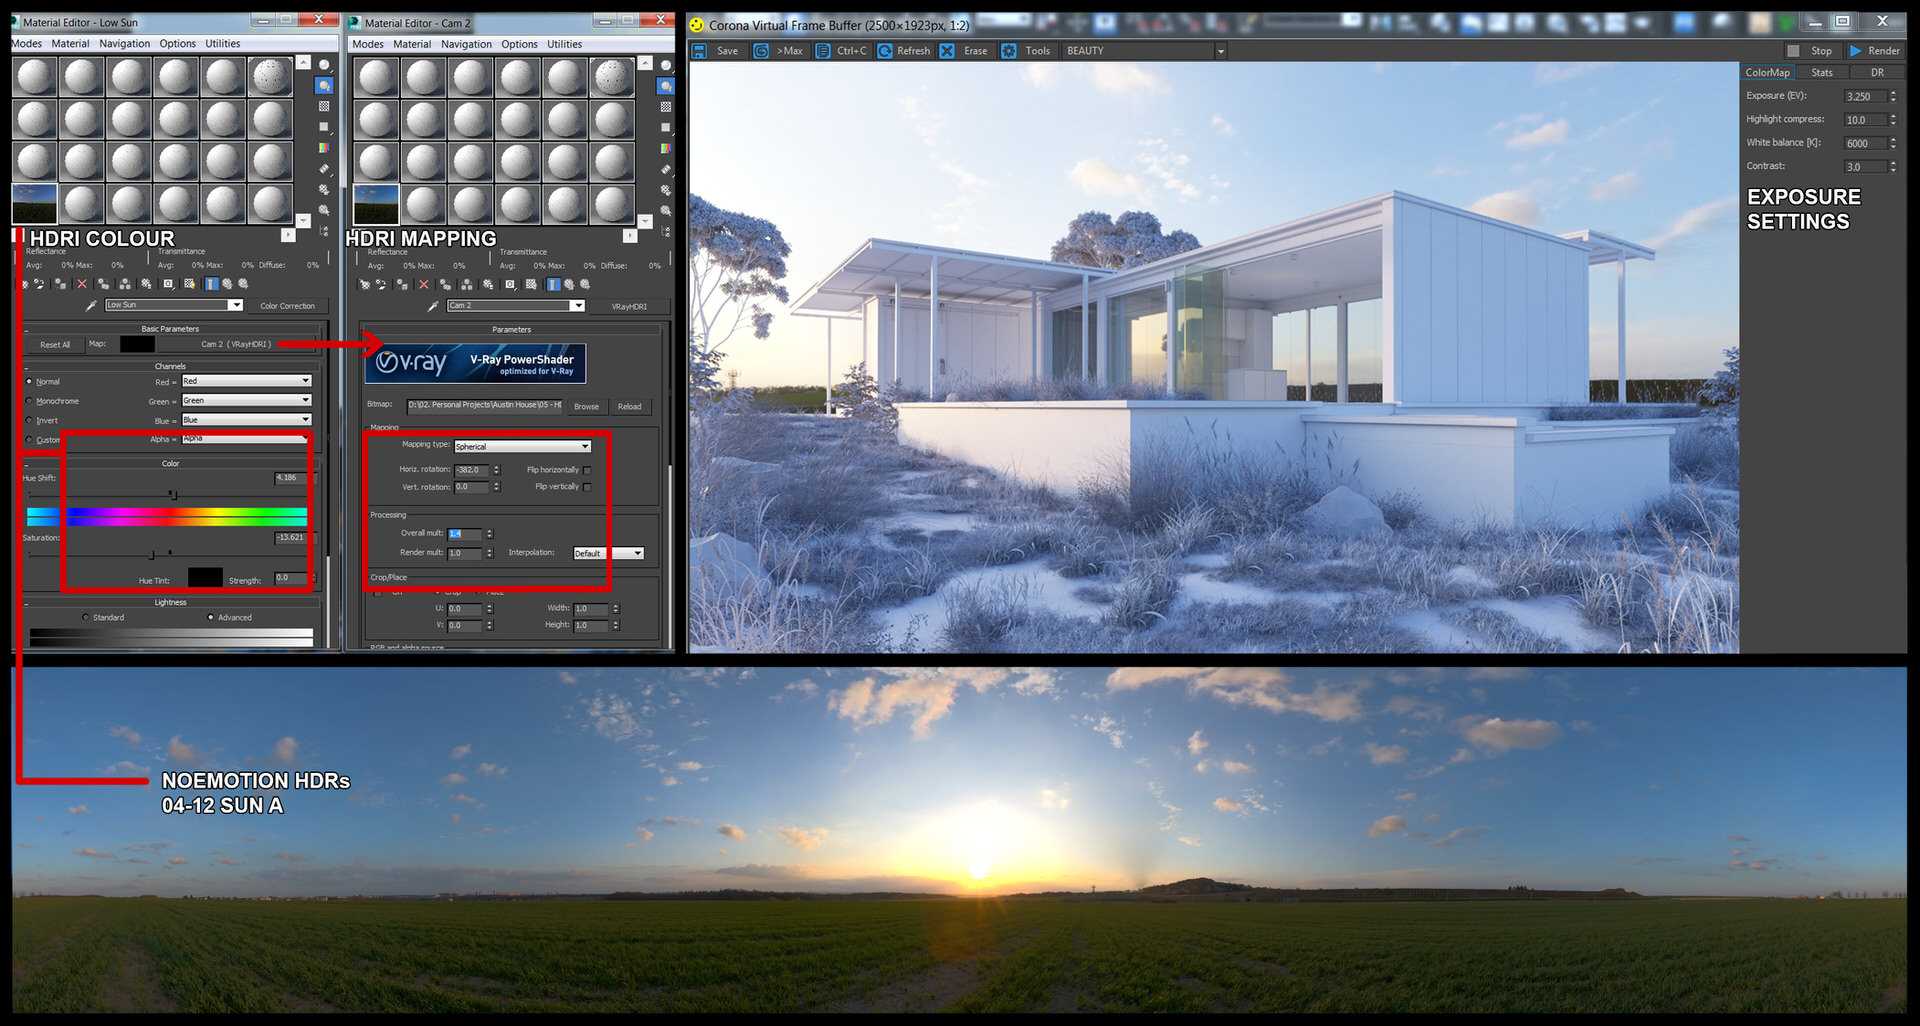
Насколько чёткими будут тени на изображении — напрямую зависит от размера источника света. На этих HDRI-картах солнце — главный источник света. На изображении слева тени очень чёткие. Так получилось, потому что самые яркие пиксели в этом HDRI расположены на очень маленькой области.
На правой картинке солнце намного больше по размеру, а в середине солнечной «звезды» совсем нет пикселей, которые были бы ярче остальных. Таким образом, все эти пиксели сильно влияют на общее освещение. Из-за большого солнца тени мягкие и проявляются очень слабо. Они едва видны, потому что почти нет разницы в яркости между солнцем и небом. Таким образом, баланс освещения сбивается.![]()

![Рейтинг топ-8 лучших ноутбуков для анимации в 2021-2022 году [2d, 3d, ar, vr]](http://pvtest.ru/wp-content/uploads/8/d/e/8de4fc6ad2da64e59fbc1187e2125c25.jpeg)

